How to Use Rolling Float
By Gearlab Outdoors

There are three key components to rolling a kayak: #1 Driving the legs and thigh, #2 Body buoyancy, and #3 Paddle floatation.
Gearlab Rolling Float helps you to be more comfortable with your body balance during your kayak rolling practice. The product is intuitive and provides more initial buoyancy than a paddle. Using the Rolling Float, you can practice more with elegance and confidence, minus the cumbersome wet exits.
- How to Use Rolling Float -
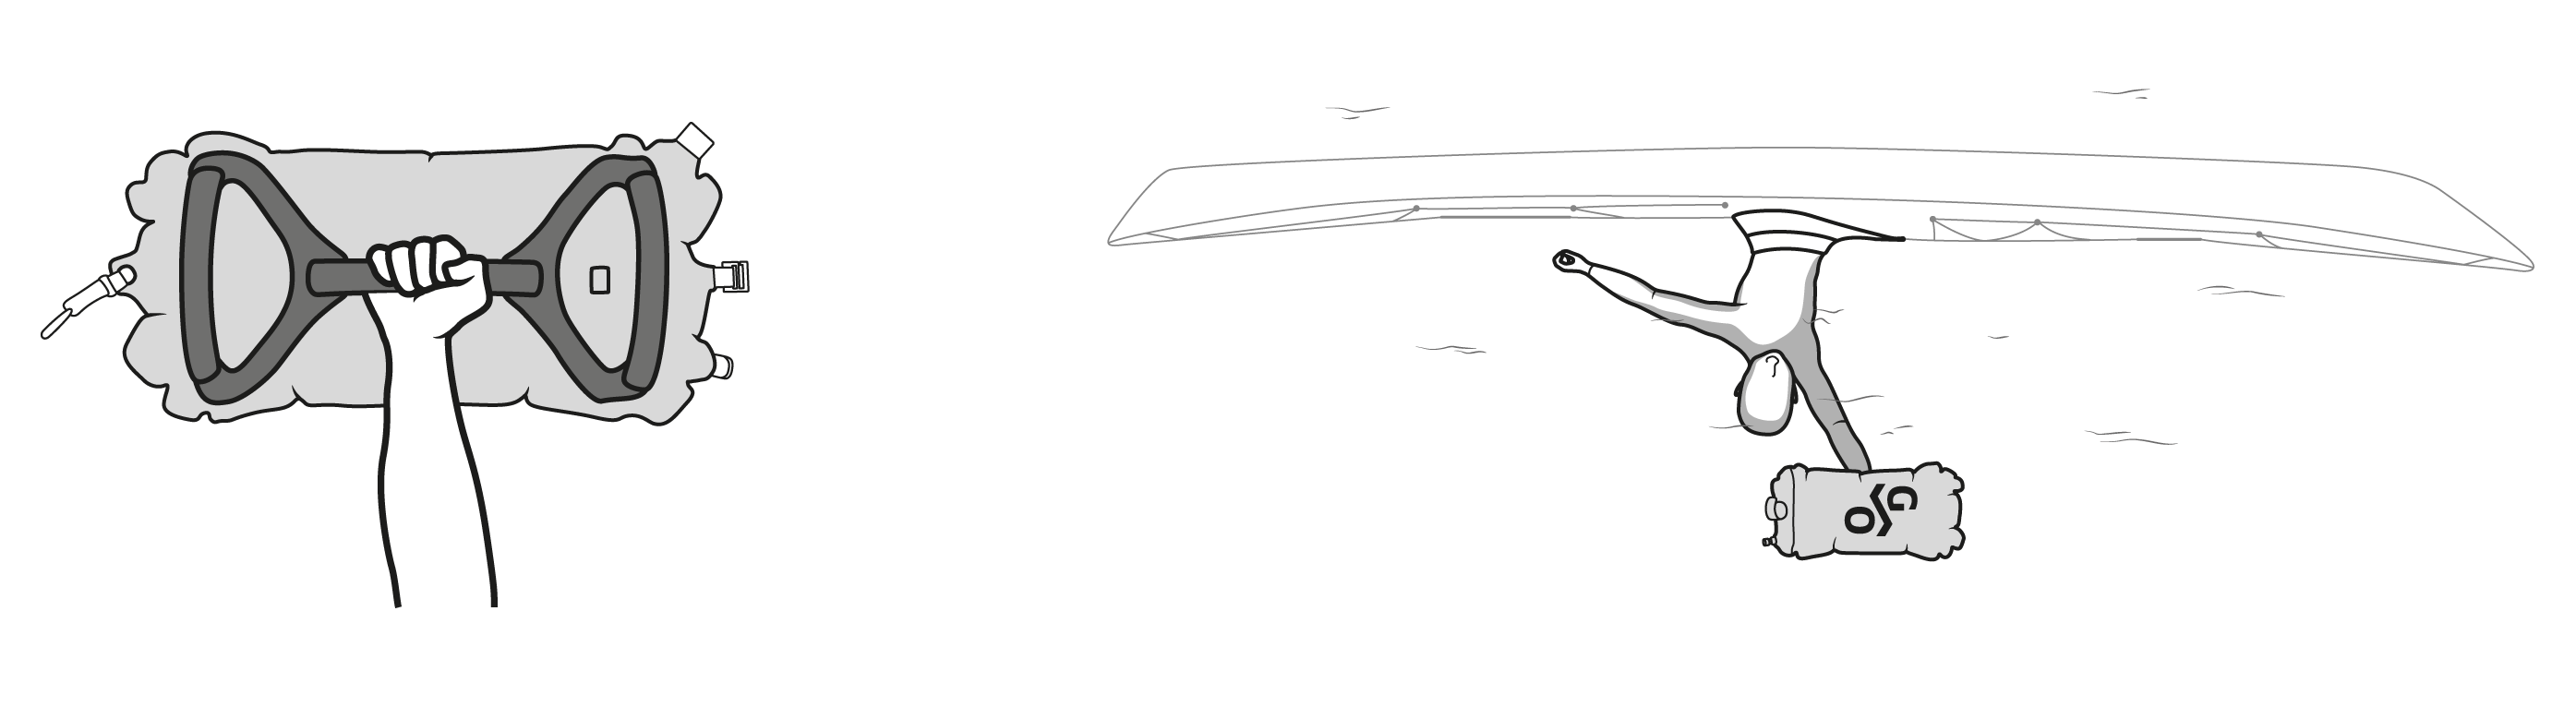
• Practice with One-Hand Grip method
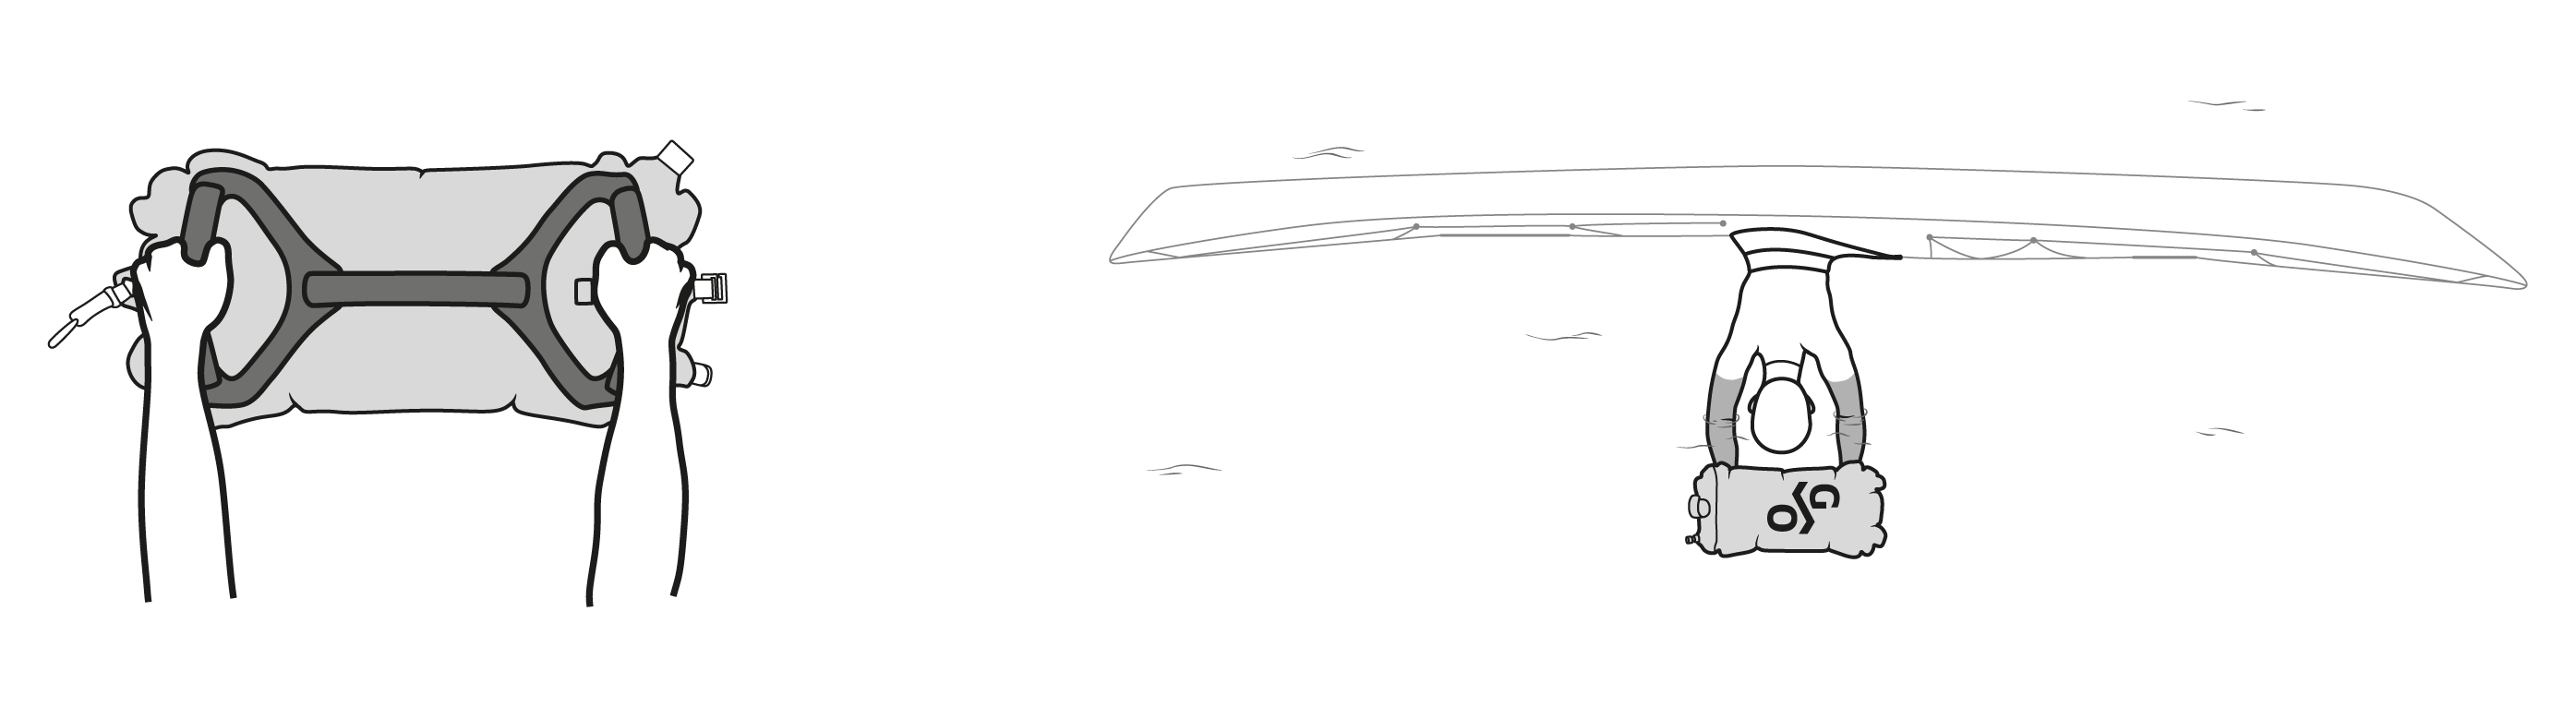
• Practice with Two-Hand Grip method
- How to Roll with a Paddle -
The following content is authorized by Qajaqrolls.com
• Standard Greenland Roll
| Step 1 |
Set up with the paddle parallel with the kayak on the left side, extended towards the front, right hand furthest forward. (When learning extend the paddle as far as possible using your left hand very near the tip this will give you the most righting moment from the sweep) Hold the paddle with two hands palm down holding the blade across the palm. Lean forward with forehead towards the left knee and outwards rotating your body slightly left. Roll in towards the left.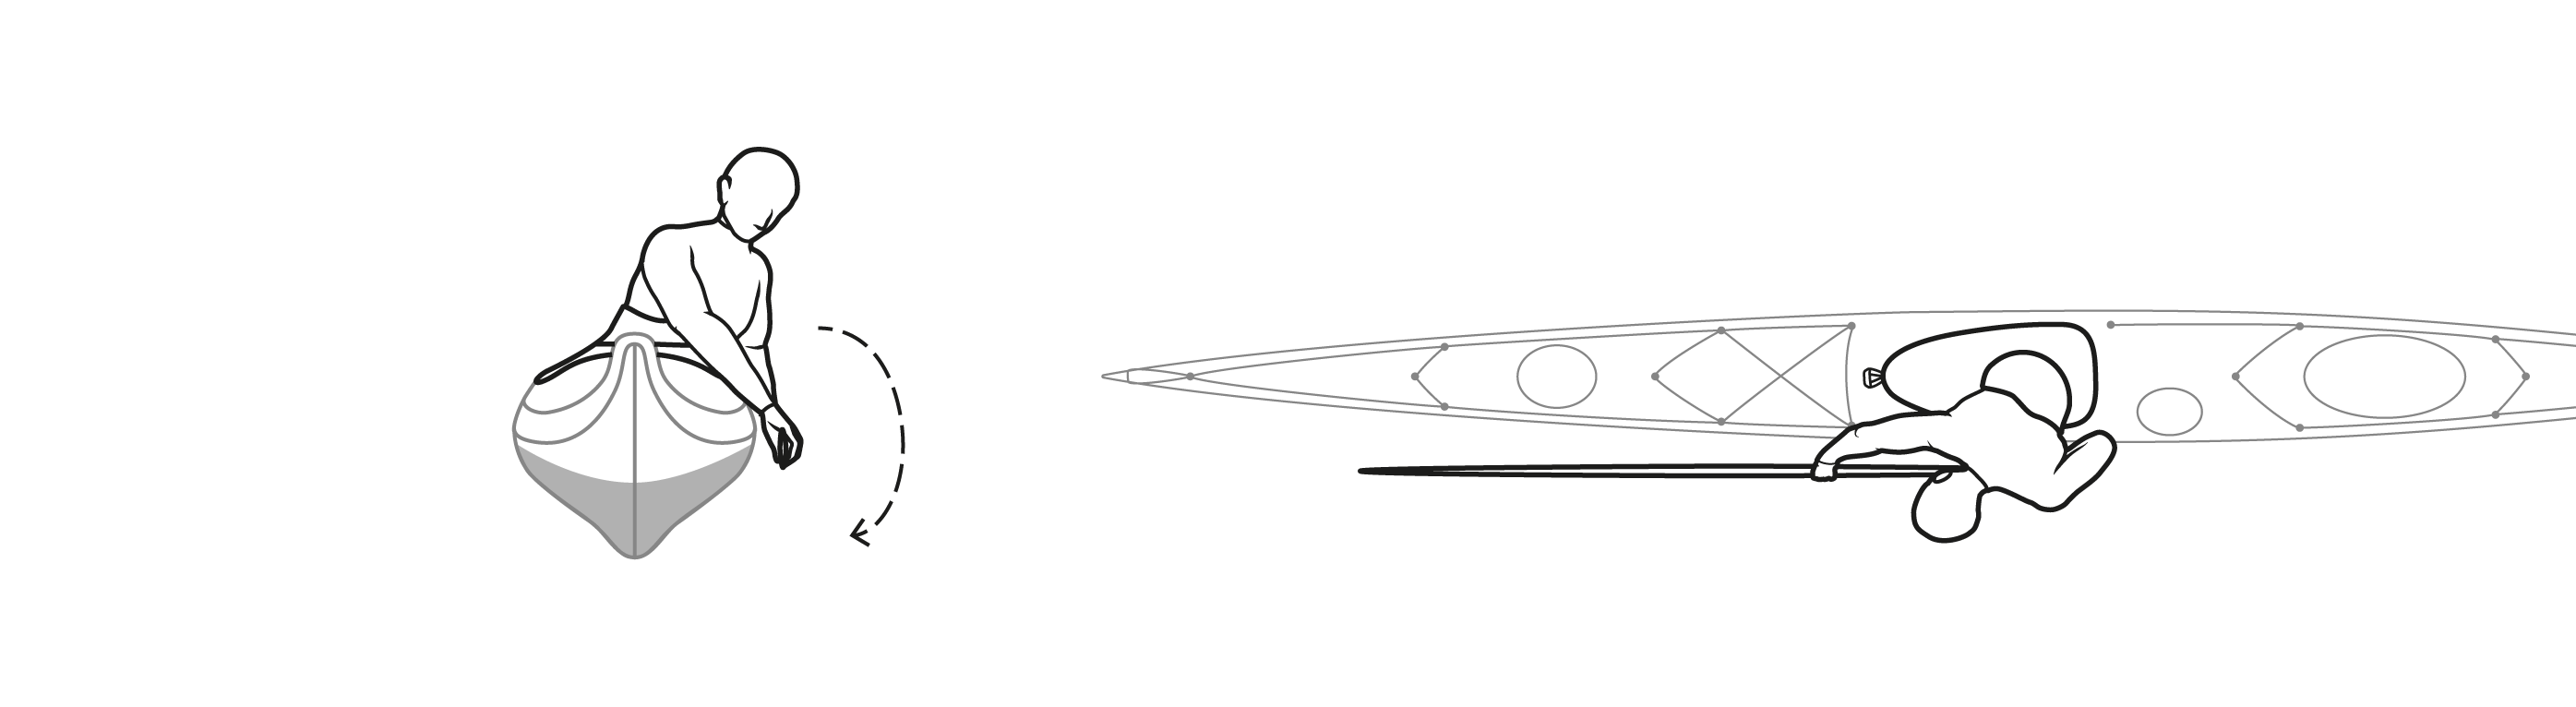
| Step 2 |
Allow the kayak to fully rotate until the paddle breaks the surface, at this point your shoulders should be rotated slightly so your chest is almost parallel to the kayak. At this point three separate body motions need to occur; the first is to slowly lean back arching your back (dive your head away from the air! It won’t feel natural you will want instinctively to do the opposite) this will start to bring the kayak flat.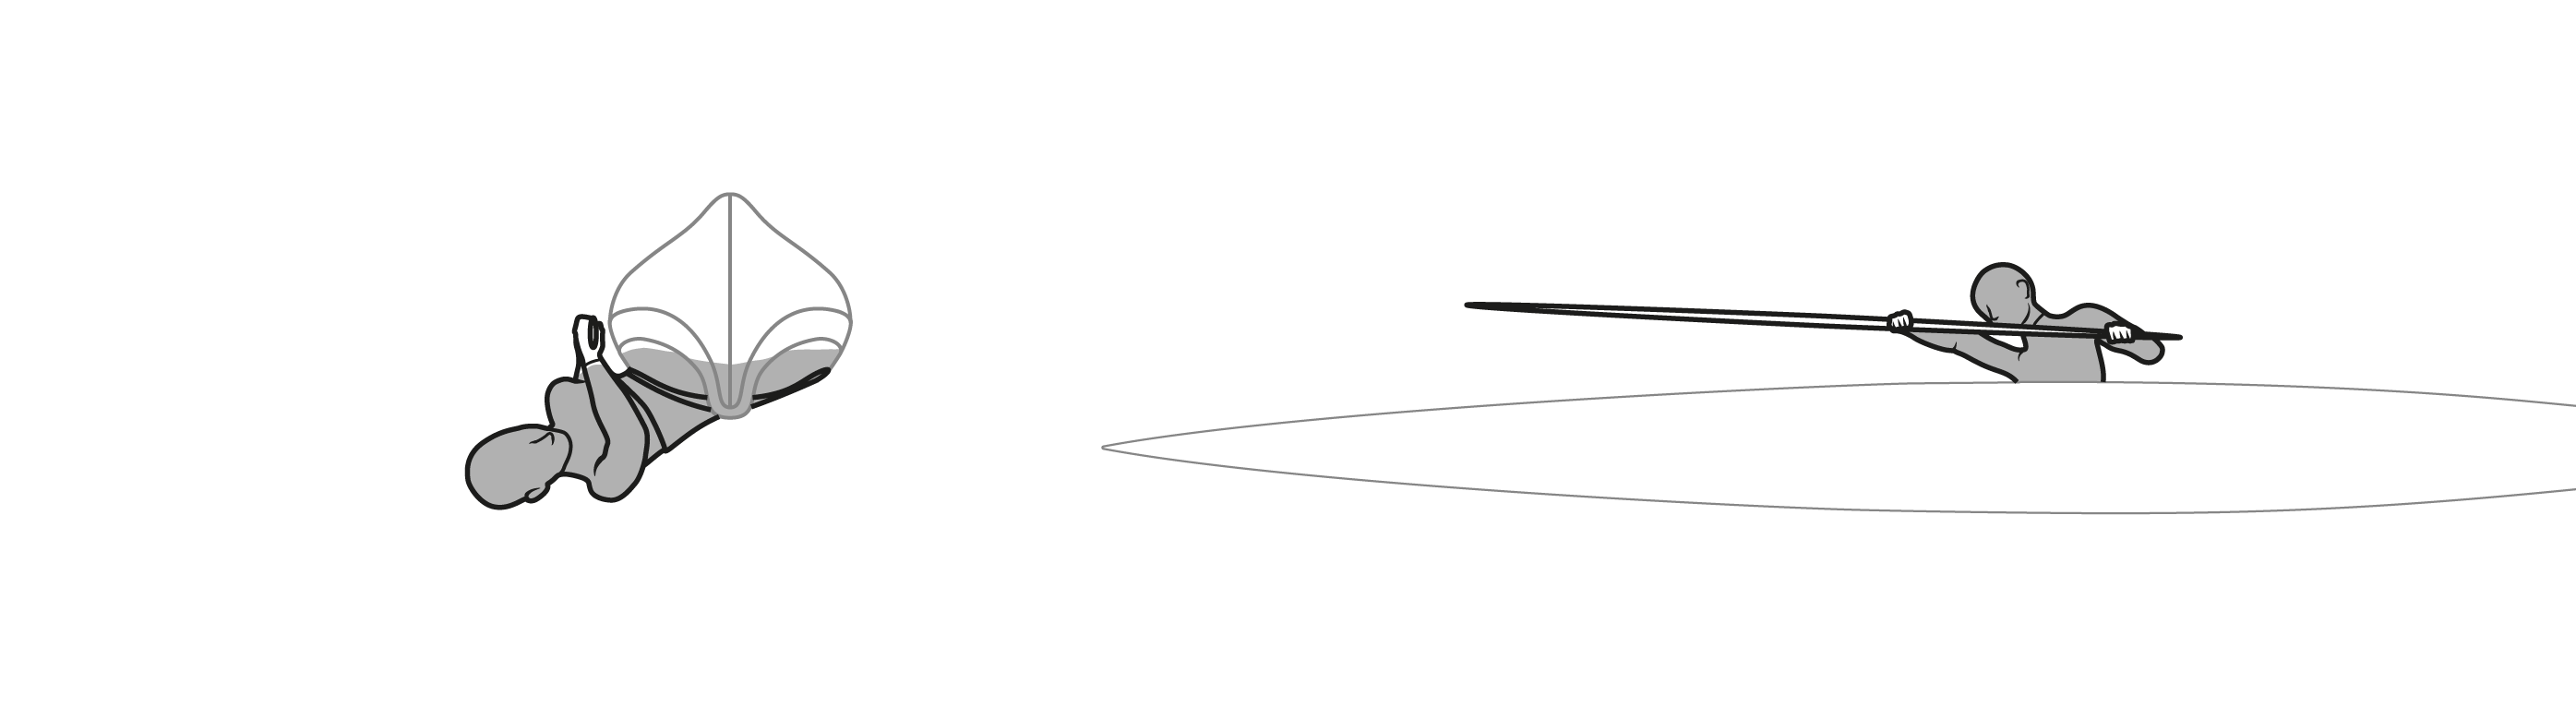
| Step 3 |
Then start an outwards sweep of the paddle keeping the left hand touching the left side of your chest sweep the right hand out in a graceful arc. Rotate your core clockwise towards the back of the kayak keeping your eyes focused on the end of the paddle, and just for good measure engage the right knee with the masik or thigh brace/deck to provide additional righting moment for the kayak.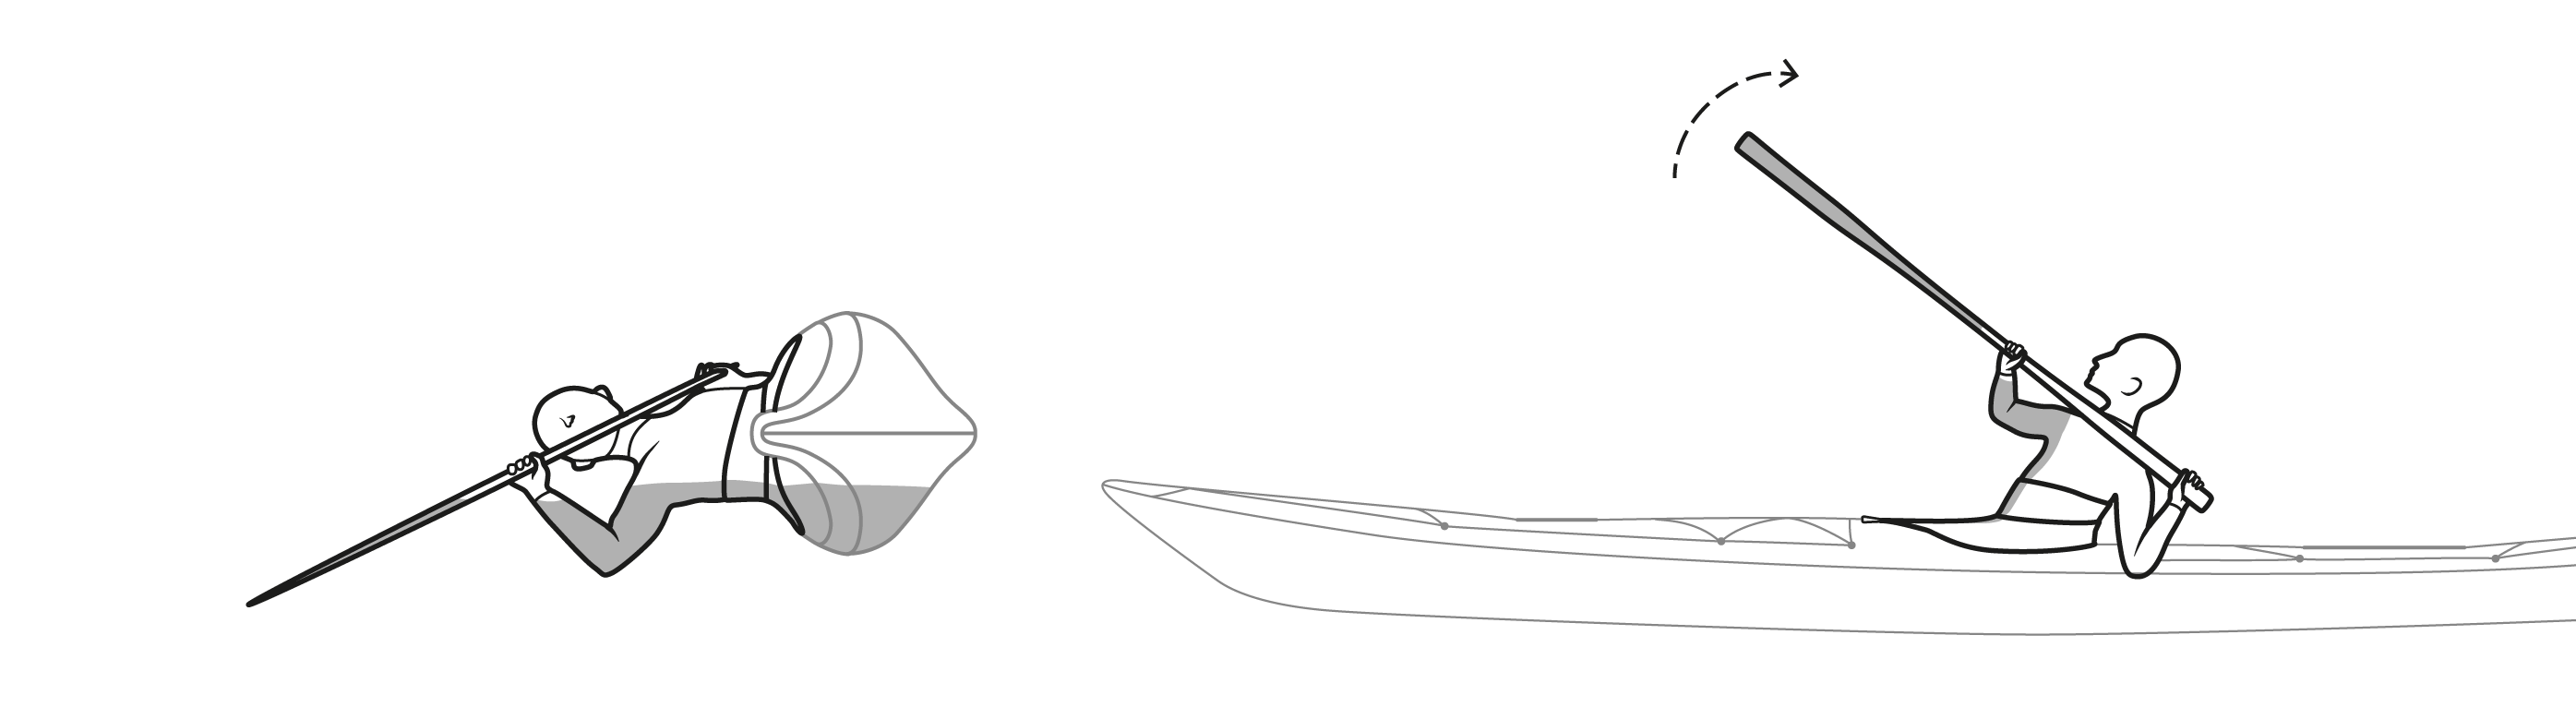
| Step 4 |
Do not heave down on the paddle during this roll, the sweep of the paddle across the surface will provide tremendous lift throughout the movement allowing you to gently right the kayak and slide onto the back deck. The last part of your body to get onto the back deck should be your head. When you finish your paddle should be at right angles to the kayak resting across your chest.
• Storm Roll
| Step 1 |
The storm roll is a forward starting forward finishing roll. Set up by holding the paddle on the left side of the kayak with the paddle extended forward, with your left hand hold the blade but instead of holding it across your palm, hold it deep in the V formed between your palm and your thumb (this will help when starting to learn as it will force the blade to be at the correct angle on the surface while completing the roll. Place your right hand normally on the loom of the paddle. You start with your body crunched forward as low as you can on the deck and you want to keep your head as close to the deck as you can throughout the roll, you will find as you begin that you naturally tend to sit up a bit as gravity pulls you down away from the deck.
You should resist this as much as you can. Throughout this roll keep the paddle in contact with the hull. To start with it will be touching the offside and then will rise up into the side of the hull as it rotates and then its fulcrum will move across the foredeck as the kayak rotates. You can think of this as the pivot point of the lever but you really will not end up using the paddle as much of a lever. Most of the righting moment will come from your body position and buoyancy.
| Step 2 |
When upside down, with practice and concentration you can keep close to the deck. At this stage think about getting your head close to the surface looking forward a little. Imagine pushing your chin towards the surface. This will help arch your back.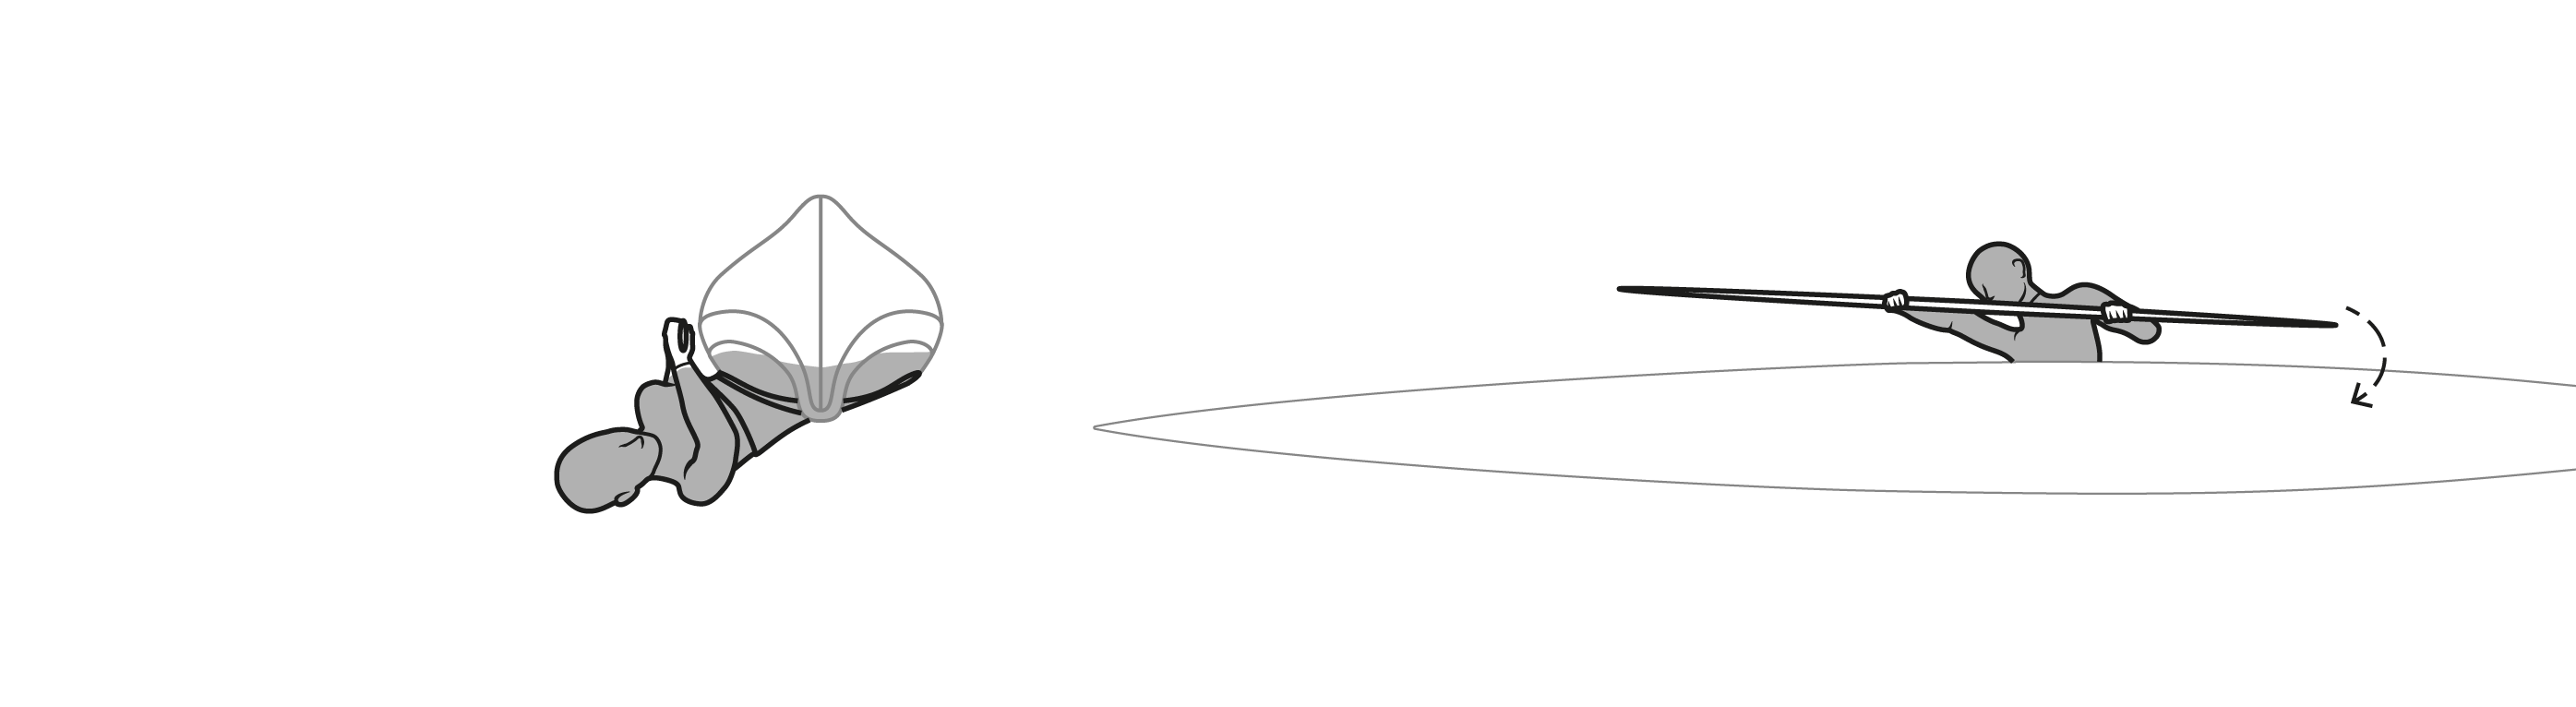
| Step 3 |
Now push the back end of the paddle out of the water a little and get it hig up the side of the kayak. Start sweeping outwards with your right hand. At this moment sink your chin to your chest and push your nose towards your right knee. Crunch your abs down hard. As the paddle starts to sweep outwards push your left hand forward remaining in contact with the hull. The kayak hull will start to rotate as you push your head down. Do not make any attempt to get you head out of the water until the hull is well past the vertical position.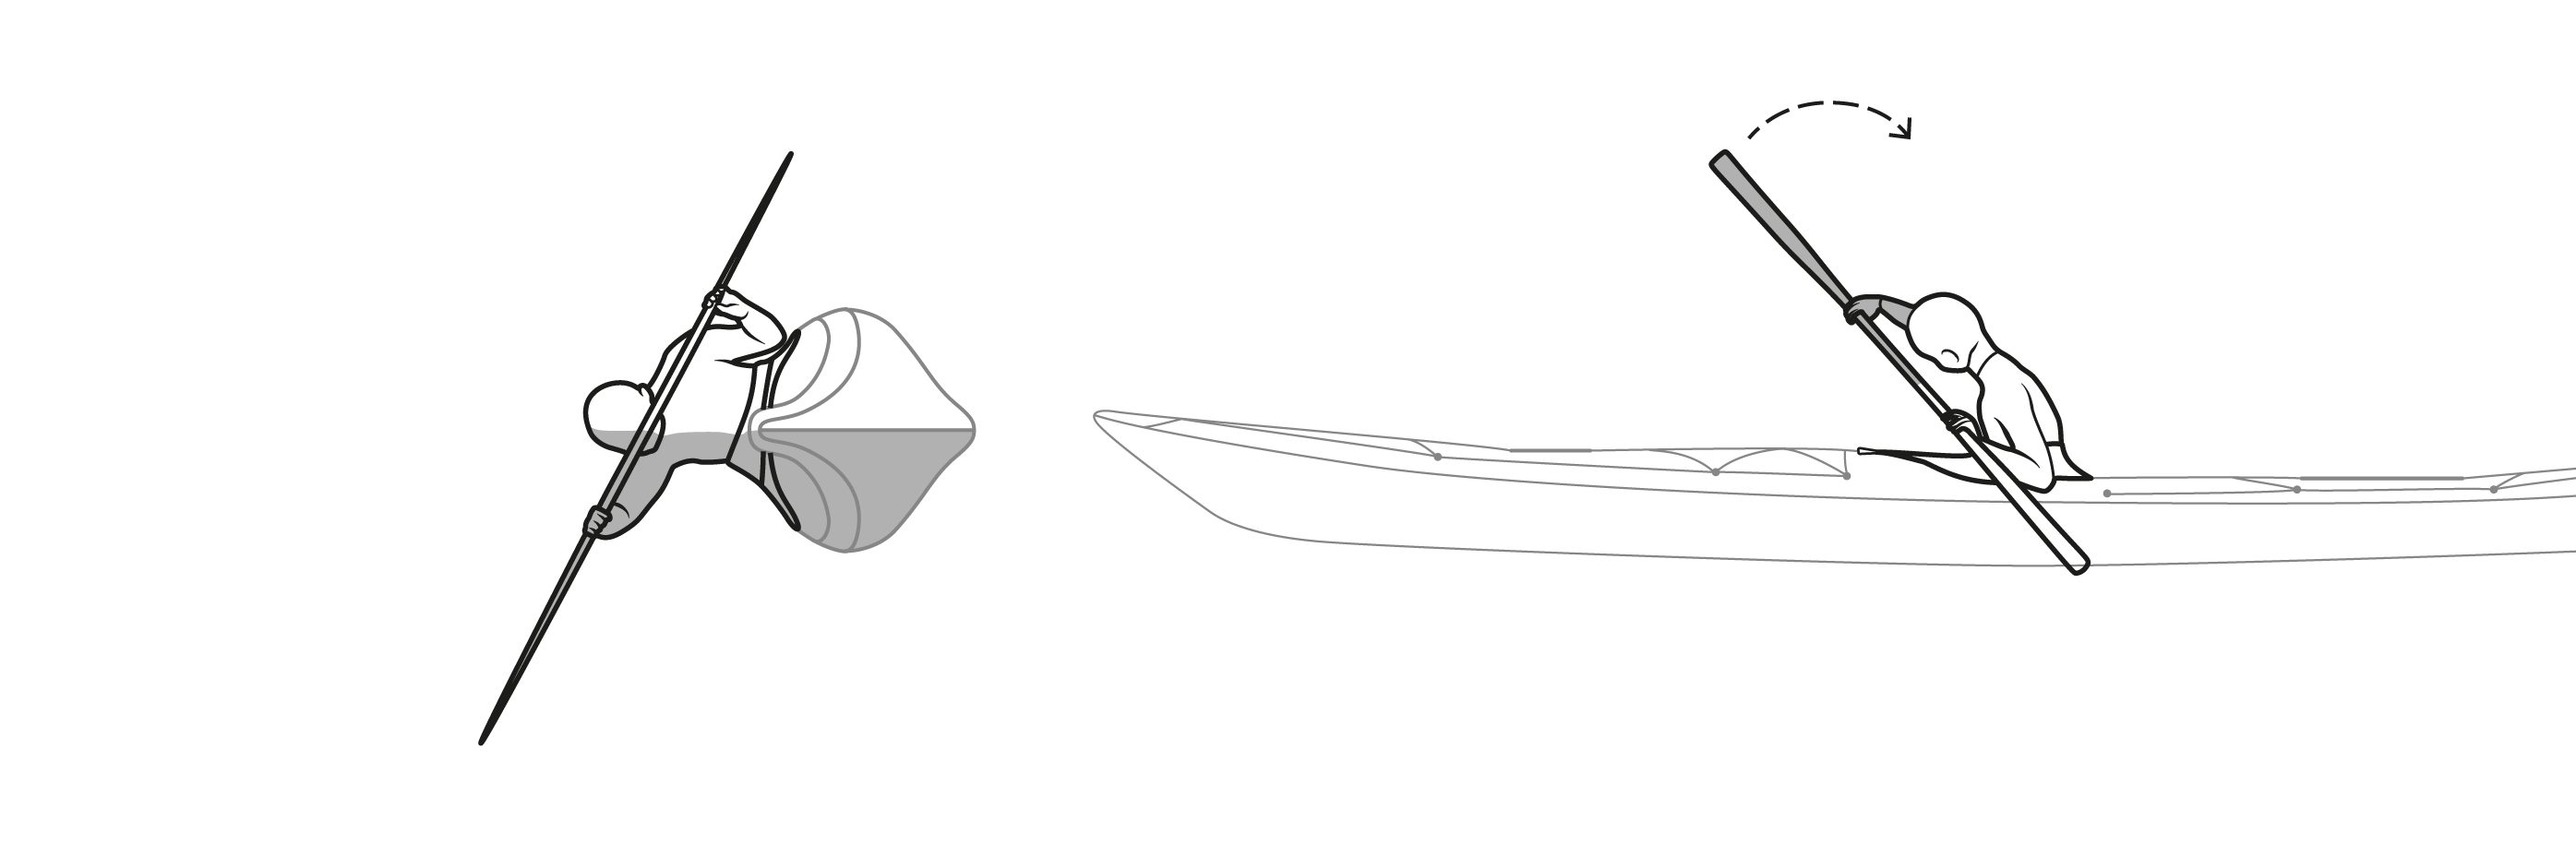
| Step 4 |
The end of the roll is a critical portion. This roll is a low brace roll, it completes the same way a low brace does with the Greenland paddle by drawing the paddle across the kayak towards the left side, this action creates additional lift helping finishing the kayaks rotation. Keep your head in the water as long as possible. Think about dragging your nose across the deck as you finish the roll. The best style is to keep the paddle in contact with the kayaks deck throughout the roll, don’t worry if to begin with you complete the roll off the deck, it’s easy to get on the deck later. A good practice exercise for this roll is the chest scull, as this forces you to learn the low brace finish to recover from the sculling position. The low brace finish becomes the key to many forward finishing paddle rolls.
The pry version of this roll does not rely on the sweep to gain leverage instead you swing the paddle round until it is perpendicular to the kayak and then you drive the kayak to rotate with your knee and pulling down on the paddle for leverage. With this approach the paddle will sink quite deep in the water, but have faith in your low brace recovery and draw the paddle in across the deck to complete the rotation.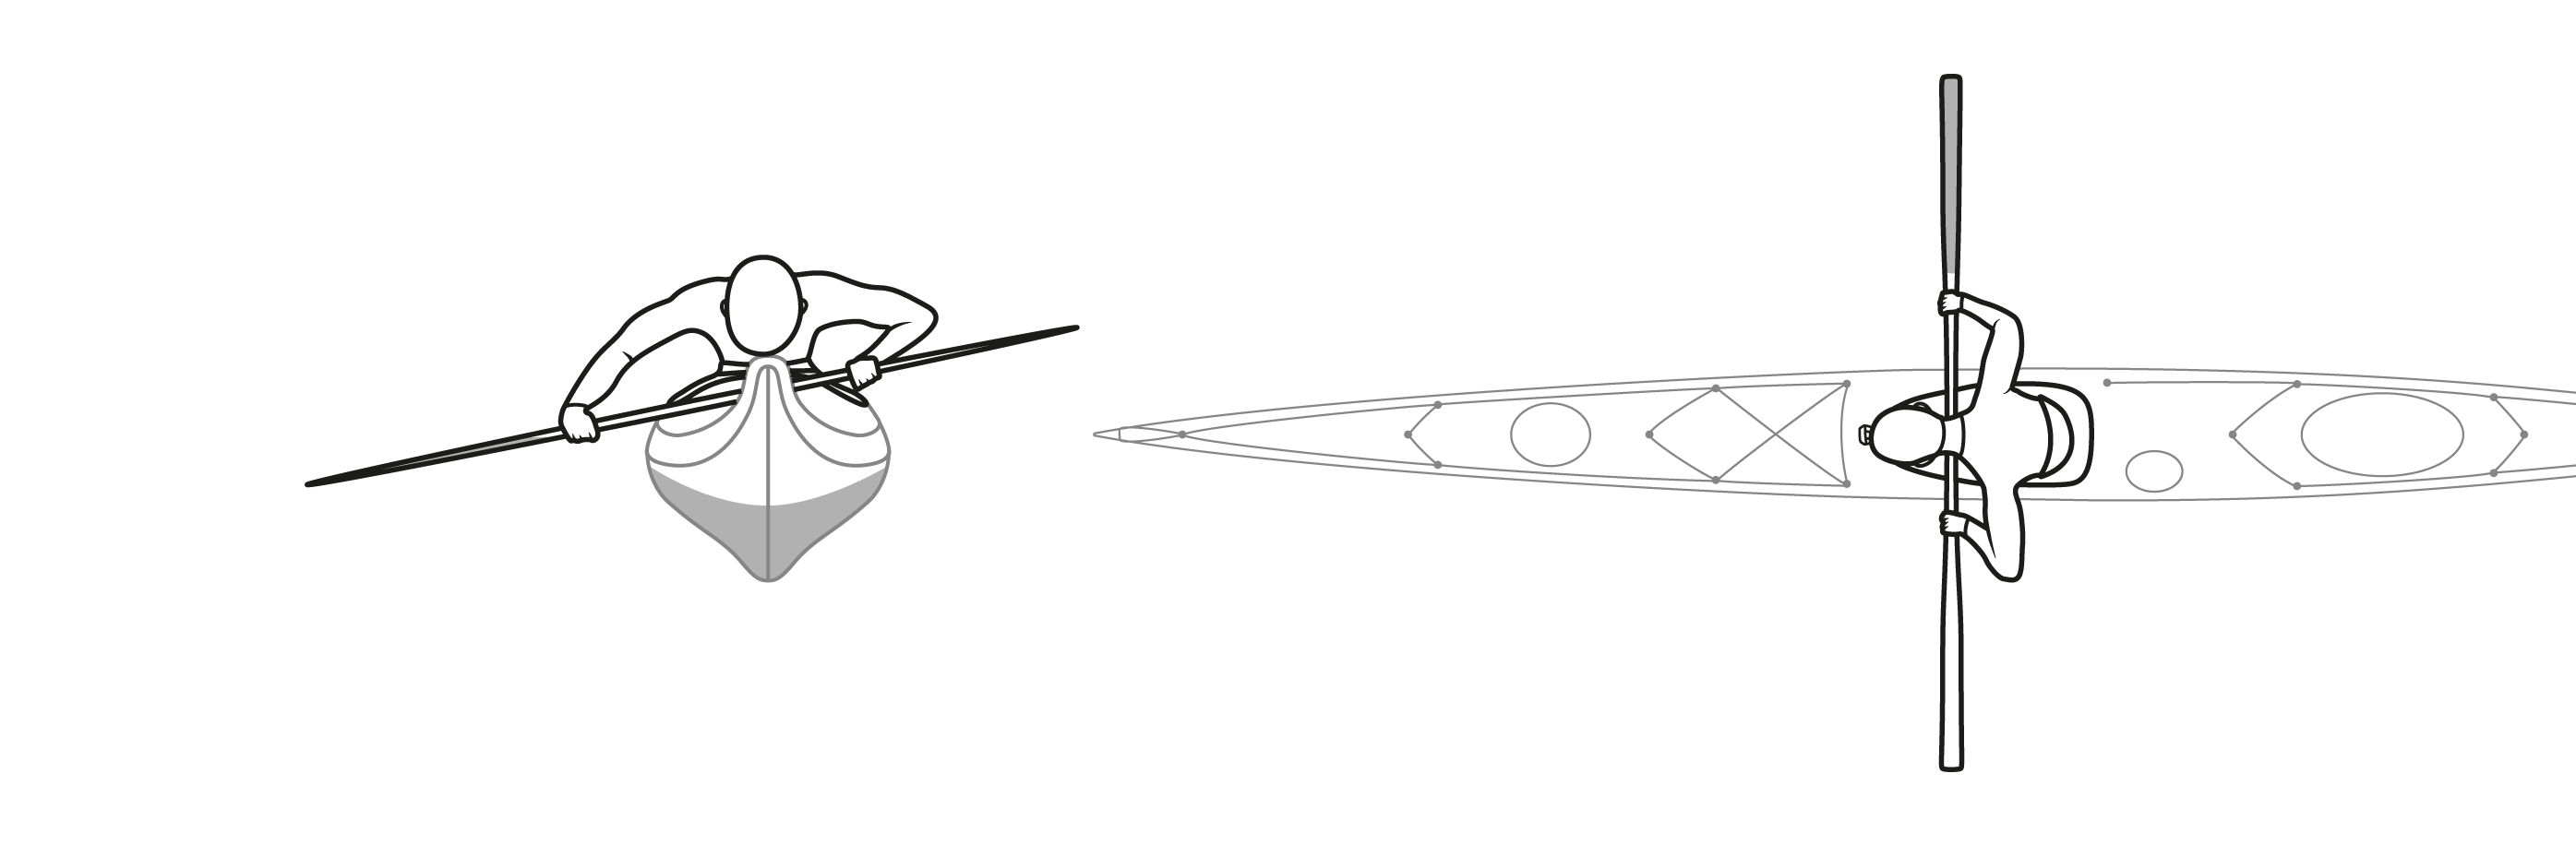
• Reverse Sweep Roll
| Step 1 |
To set up hold the paddle extended out to the right at chest level, left hand close to the end of the blade with the blade across your palm and the right hand the same way grasping the loom. Rotate your body clockwise (a long way) and hook the end of the paddle on the left side of the kayak (this is the right side of the kayak when looking backwards!) lean your body towards the back of the kayak to dig the paddle in deeper into the water. It is critical at this kayak to have your right knee in good strong contact with the masik or thigh brace. You are now ready to take a leap of faith and roll in backwards.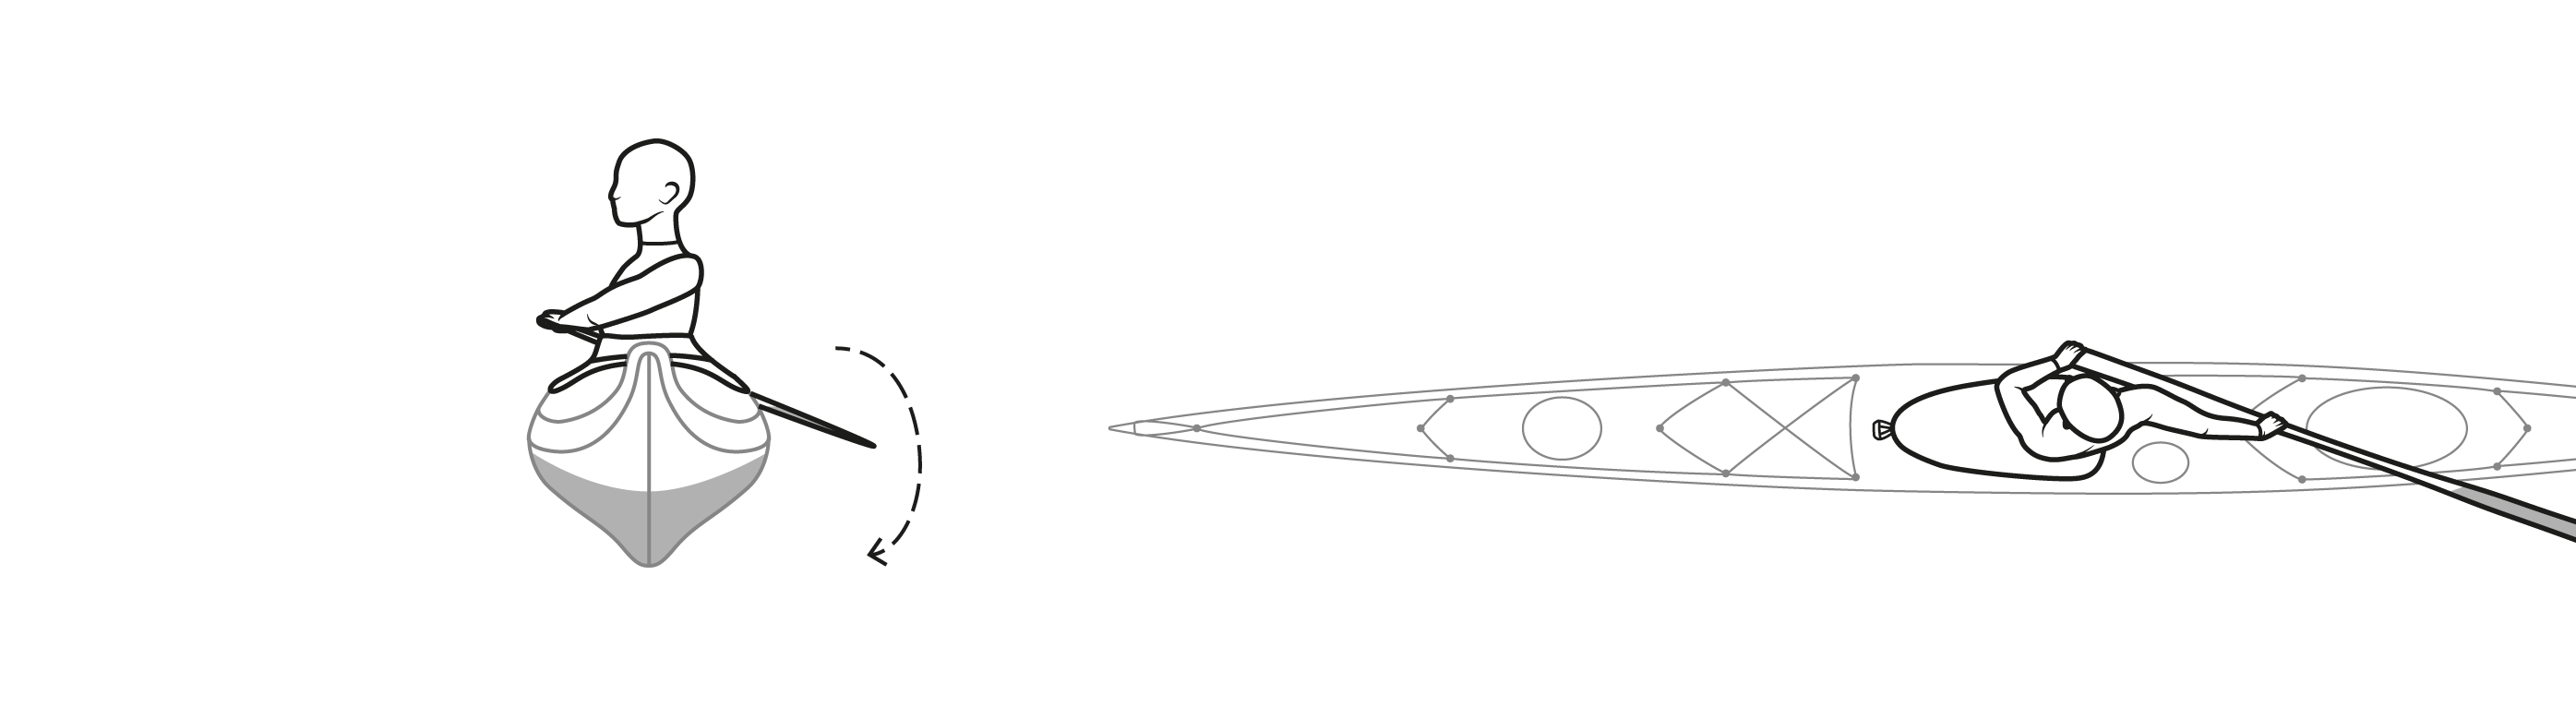
| Step 2 |
At this point when you begin learning the roll you are going to feel really disorientated, wait until you feel the kayak fully upside down and then if you are still in position you should feel that the paddle blade is out of the water, this is your sign to engage the sweep and drive! If you don’t feel the blade out of the water then reach up waggle the paddle around until you find the right place, remember you should now be face down in the water with your back arched backwards.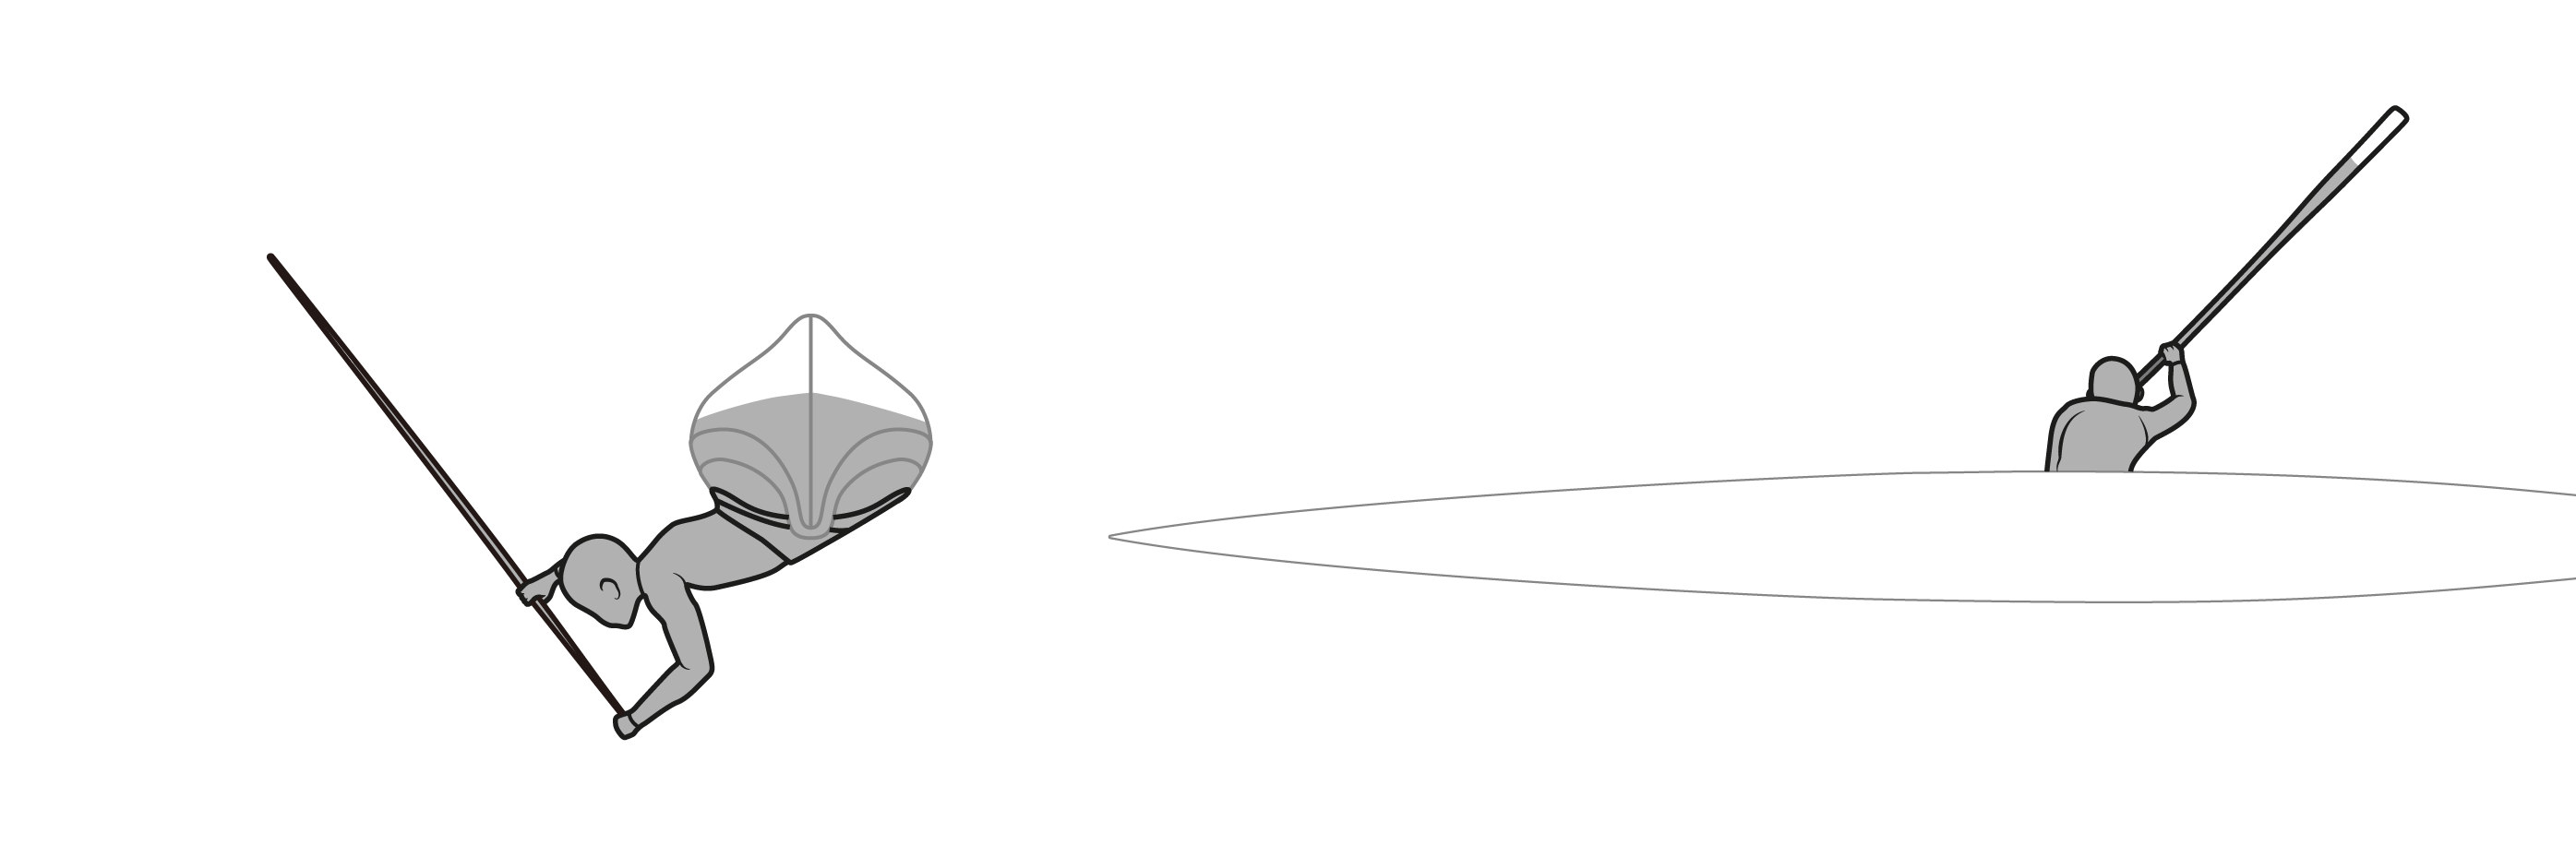
| Step 3 |
The next movement is a combination of swinging the paddle towards the front of the kayak while keeping you left hand on your chest at the same time as bending your back straight and then doing a crunch, this arch to crunch motion combined with lifting your knee towards your head will cause the kayak to rotate and will make your head to remain low and in the water.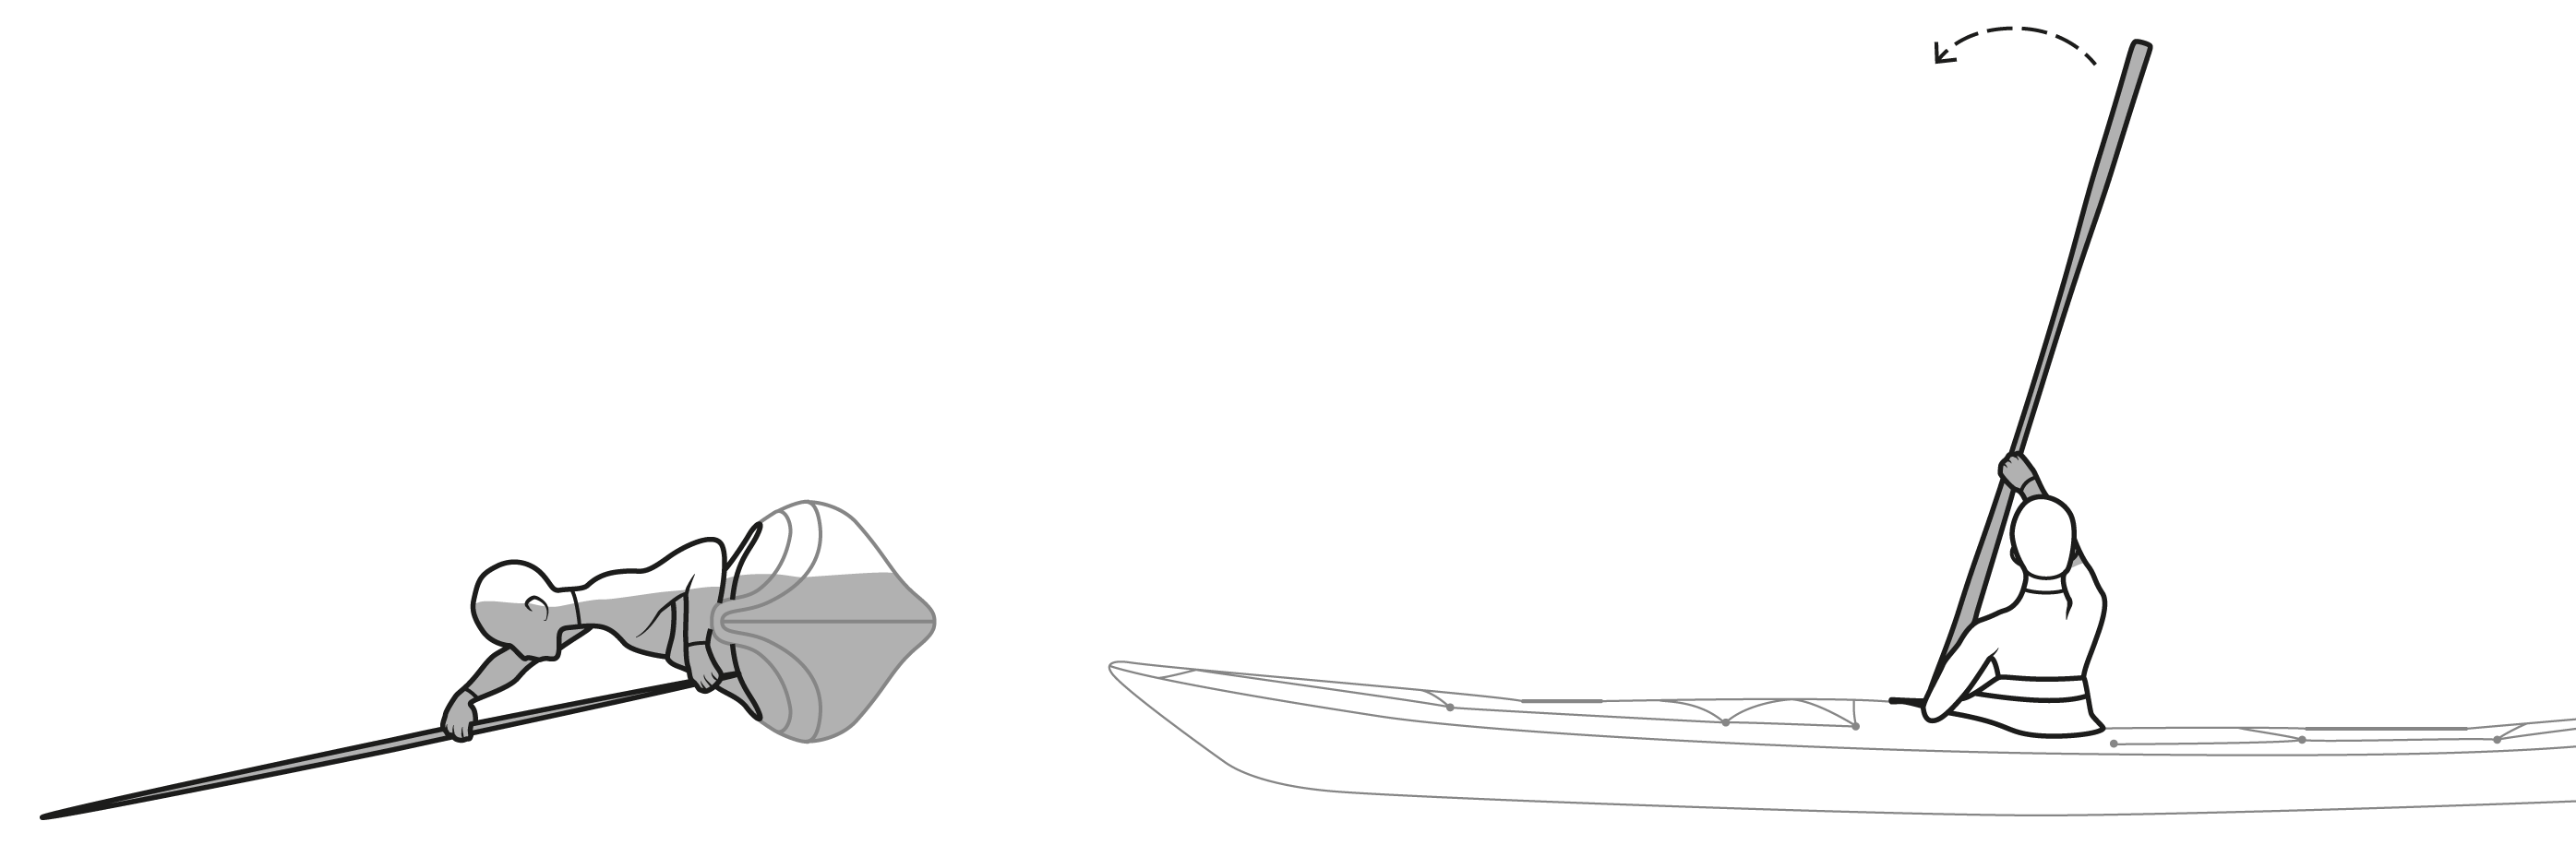
| Step 4 |
By the time your paddle is perpendicular to the kayak you should be in the crunch position and ready to sweep the paddle across the foredeck in the low brace finish. When learning the roll I found it useful to scull up at the end, until I had confidence that I was able to do the low brace recovery.
When learning this roll it is especially important to be in good contact with your cockpit, it is all too easy to lose your feeling of being at one with the kayak when bent over backwards and trying to find the kayak with your knee while doing the arch to crunch move is a real challenge. I found it useful to consciously jam my right knee hard against the masik just prior to rolling in, this strong feeling of connection helped me instinctively do the right knee raise when upside down and back to front!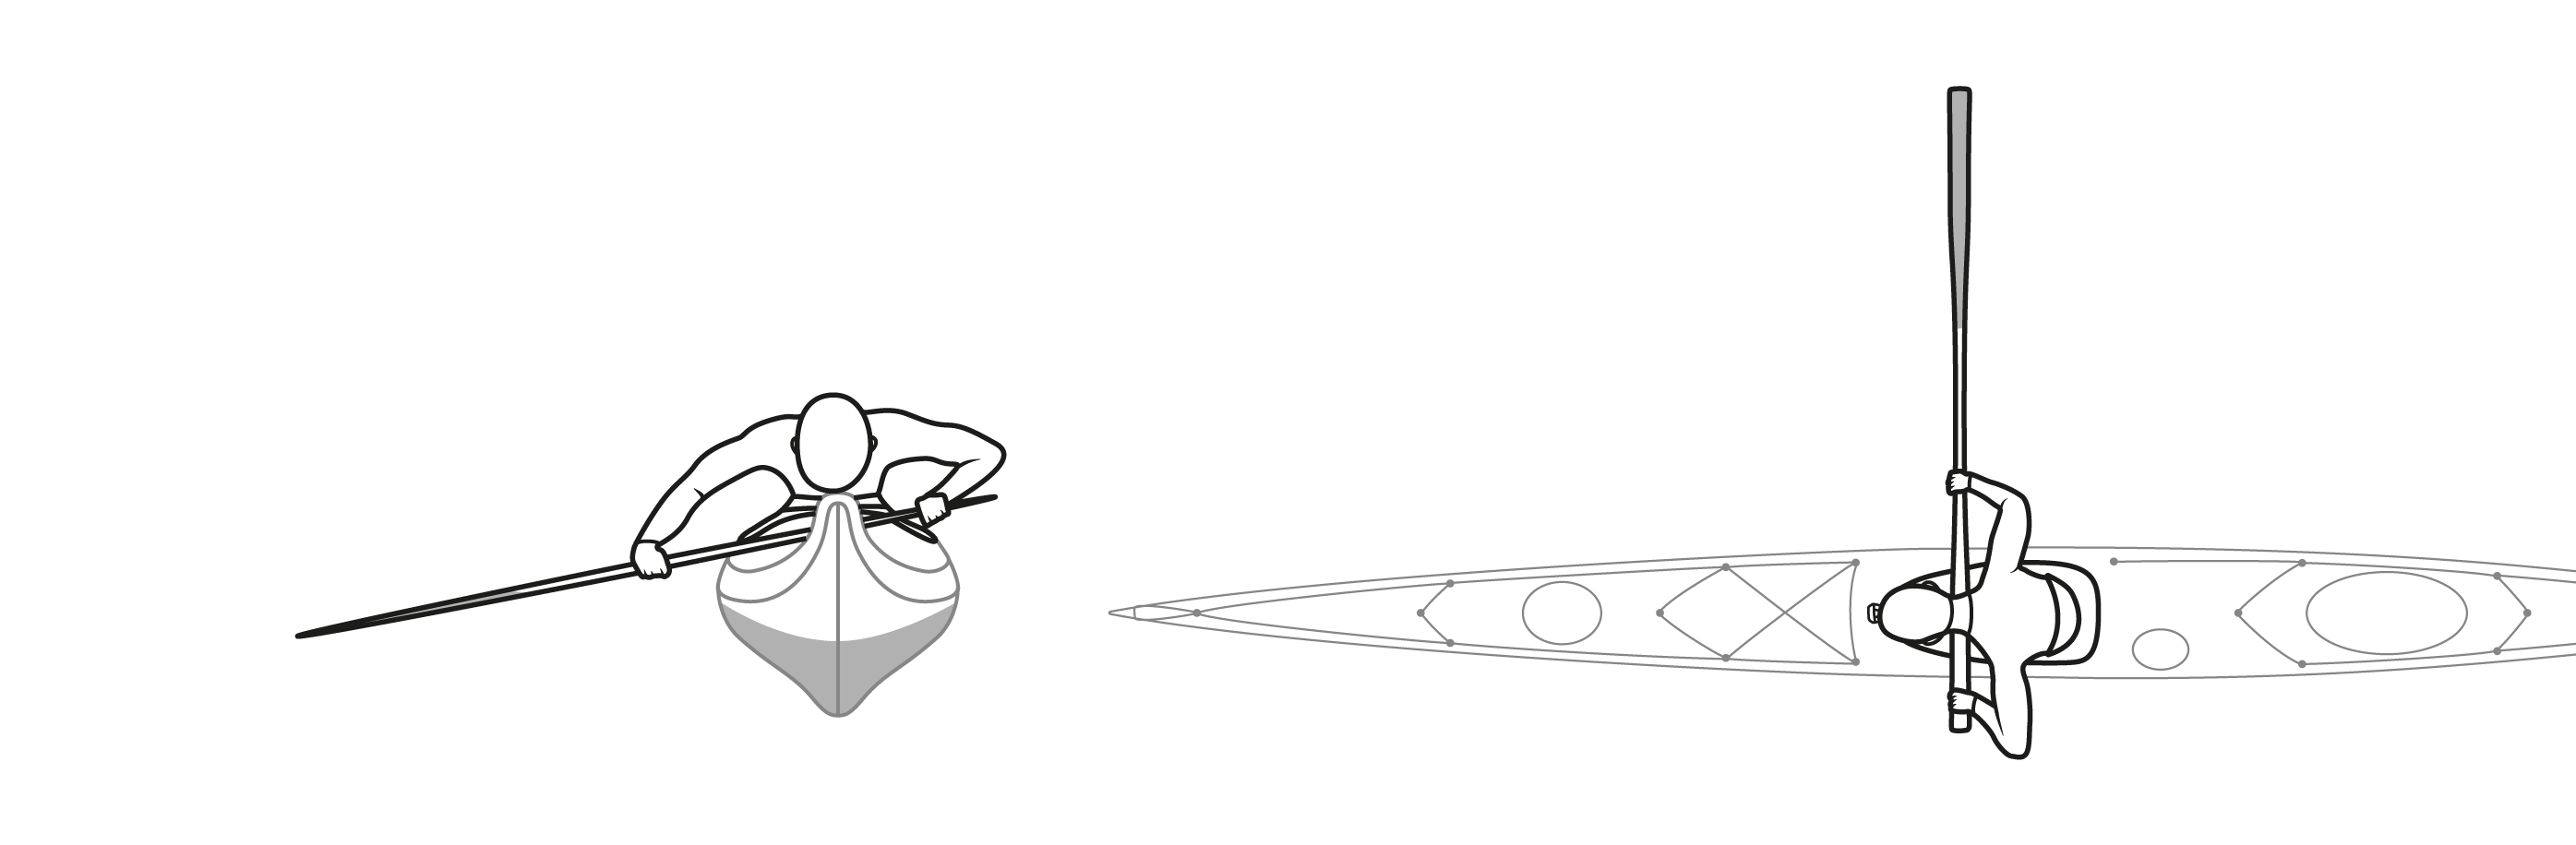
The above content is authorized by Qajaqrolls.com.